| |
Facial Rig Setup Tutorial |
| |
|
 |
A
characters face can hold just as much expression as the entire body, so it
is certainly important to make sure your facial rig meets all the criteria
needed by the animator. Indeed there are many ways of going about setting
a facial rig up, and here i will show the process of a way i find quite
efficient. |
| |
This
rig setup has the benefits of skin sliding throughout the face, meaning
that whichever object you move, the rest of the face will be altered
slightly, which helps prevent the static effect. It is also non dependant
on full shape animation on the face, making it easy to add facial poses
later along the production pipeline if needed (though i would advise
whichever method you use, shape animation should always be coupled with
it, and to always plan ahead what facial poses you will need
). |
| |
|
 |
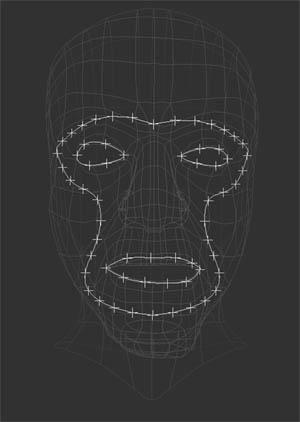
So to begin with we
need to start by mapping our deformation curves along the face, its
important to note that these curves should follow the areas of the face
that are driven by the muscle, as the curve will be where the movement is
initially dirven from. For this tutorial, i drew my curve starting from
above the nose, along the eyebrow, following around the eye to the upper
cheak bone, following along side the mouth then looping aroud the
chin.
A second curve is then
used for the mouth, as well as two more curves for the eyes.
A quick tip for
drawing your curves, enable snap mode, so it autmatically places the
points where the points on the mesh are. |
| |
|
 |
Once we have the
curves drawn out, we should create a null, then path constrain this null
to the main curve and activate the tangent, once constrained, duplicate
it, and increase the path%, continually doing that until the nulls follow
the entire curve. I chose to duplicate the nulls with an increment of 5 on
the main curve.
Again we do the same
method for both the eyes and mouth, for the mouth, i used increments of 10
then tweaked to get the nulls in the correct positions for deformation,
and the same for the eyes only using a larger increment. |
| |
|
| |
So now you should
have four curves in total, all with nulls path constrained to them. We
will now move onto creating the main head bone, so we will use a two bone
chain, setup as shown on the picture to the left, and then create another
bone, which will follow the jaw line. The root of this jawbone should be a
child of the first head bone as this will allow the jaw to follow the
head. |
| |
|
| |
The next stage
involves creating clusters with centers from our curves, so select the
curve, and select each point indivually, and each time choose "create
cluster with center" you will notice that it generates a null at the
point, and if you translate the null then the curve will deform with it
which in turn effects all the nulls that are constraind to the curve, from
this you should grasp how this will work to stretch the skin |
| |
We dont really want
to animate straight on these nulls, mainly because there simply messy, and
make it harder for the animator to see whats going on, instead, a more
suiting object would be an implicit cube or such, but before we can do
that, we need to break the parent relationship between the nulls and the
curve, so select all the nulls that were just generated, and cut the
parenting. |
 |
Now create an
implicit cube, and enable snapping to nulls, and snap an implicit ccube to
each of the control nulls. Then each cube that was snapped to a null wants
to be the parent of the null it was snapped to. Making it possible to
manipulate the curve by translating the implicit cube. |
| |
f |
 |
For the jaw to work
correctly we need to parent the bottom control objects that are around the
jaw to the jaw bone effector. So select the jaw bone effector, and choose
"constrain / parent " then select the relavant ctrl objects that follow
the jaw, now you should find that when you move the jaw effector in the Y
position, the mouth will open, and the curve will deform. The rest of the
ctrl objects should be made children of the main head bone. |
 |
Once we have got this
far you will see that there is now quite a lot of objects within the
facial rig, so we should organise these into layers, making it easy to
make certain objects visible or not. I chose to create a seperate layer
for the following object types:
CTRL
objects
Deformer
Objects
Curves
CTRL Nulls
Geometry
|
| |
Now our scene is
better organised we can start to think about enveloping, so make only the
geometry and deformer layers visible, and with the geometry selected
choose, "envelope / set envelope " hide the geometry layer and select all
the deformers. Right click to confirm. |
|
I found that i did
not need to alter the enveloping to much, though the main areas were as
follows, the forehead (so the entire skull doesnt lift when you raise the
eyebrows), the nose (so the nose doesnt completely move when you alter the
jaw or forehead) and the lips, just because there normally modelled quite
close to each other so the point wieghting will need
adjusting. |
| |
The main rig is now
complete and could be animated on. I would advise to create transform
saves of the implicit cubes to allow for use in the animation mixer, and
ultimatly giving the ability of slider driven facial animation, which the
animator will most likely be familiar with.
Regards
Mike
Malinowski
hejherbert@hotmail.com
http://www.starlitestudios.net |